How To: Add Lights and Light Effects using Lenslight App
This photo was inspired by a well intentioned warning. When I took it was advised to pay attention to arriving and leaving trains. Well, no trains were passing, but back home I used Lensflare Studio to add the trains - at least the lights.
I took this shot with a Sony Nex-7 and the Sony SEL 18200 at a railway station in the Austrian mountains.
I removed the contact wires using Snapheal and converted it to black and white with Intensify. Finally I added the train lights with Lensflare Studio.
Lensflare Studio helps you to add all sorts of light effects to your photos. It offers 160 effects ranging from a simple sun to a Star Trek like lensflare. Each effect can be adjusted using 12 parameters generating a huge number of possibilities to enhance your photos.
In this tutorial I explain how I used Lensflare Studio along with two other photo editing tools, Snapheal and Intensify, to create the "Lights in a Tunnel" photo.
1. Remove unwanted Objects from a Photo
Instead of Photoshop I use a dedicated photo editing software to remove unwanted objects from photos: "Snapheal". It's one of those "do one thing and do it well" tools.
It provides an automatic way to remove objects from photos and a manual clone stamp for the finishing touch.
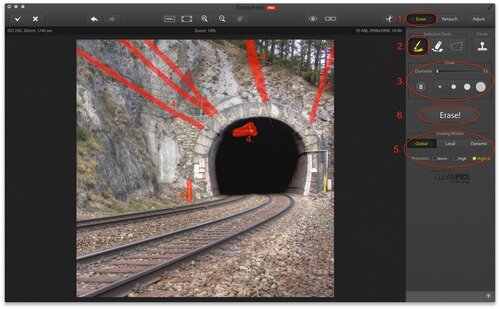
We'll remove the contact wires and all the signs from the tunnel portal. Let's start with the automatic mode to remove the contact wires.
- Make sure you're in erase mode by clicking the "Erase" button at the top right corner.
- Select the brush in the "Selection Tools" panel. We just need to brush over the areas that should be removed.
- Select the diameter of the brush. Snapheal will remove the area of the photo which you brushed over. Use a small diameter for small objects and a large diameter for larger objects.
- Brush over the areas of your photo you want to remove. You'll see red brush strokes. Those are the areas that will be removed.
- Snapheal offers three erase modes: "Global" for big objects, "Local" for smaller objects and "Dynamic" for e.g. imperfections of skin. I used "Global" here. If you're not satisfied with the erase mode you choose, simply click on any other mode and Snapheal will re-render the photo.
- Press "Erase". Snapheal will now do its best to remove the areas you've previously brushed.
The automatic mode we just used works best if the objects that you want to remove are surrounded by a larger area that Snapheal can use as a replacement. Snapheal is not able to remove the signs from the tunnel portal. We have to use the clone stamp for this.
- Select "Clone" from the Tools palette
- Press the "ALT" Key on your keyboard to select the area of a photo that should be cloned.
- Paint over the area that you want to remove. The clone stamp will pickup pixels from the source area and copy them to the destination area.
2. Enhance and convert to Black and White
Once we're done removing all unwanted objects with Snapheal we'll use another photo editing software named Intensify. The software does what its name suggests. It helps you to intensify your photo by helping you to bring out the details in your photo. Intensify is from the same developers as Snapheal.
Basically Intensify works by selecting one of the many presets and then fine tuning it:
- Show all available presets by clicking "Presets"
- Chose the "detailed" preset from the "Black & White" section.
- Select the strength of the preset. I reduced the strength to 70 as 100 would be a little too much.
Each preset is made up of over a dozen individual settings. After you applied a preset you can change the individual settings by switching to "Adjust". I did that to apply a Vignette effect to the photo.
- Switch to "Adjust"
- Scroll down to the "Vignette" setting and adjust the amound, size, roundness, feather and luminosity to your taste.
3. Add the Train Lights
Finally I added the train lights with Lensflare Studio [Get it from the Mac App Store], a photo effect software specialized in adding light effects to photos.
Lensflare Studio basically works using layers. If you add multiple lighting effects to the same layer you can move them together and apply settings to all of them at once. I prefer to use a dedicated layer for each light effect.
- Add a new layer by clicking "Add Lensflare" at the bottom of the screen.
- Select the lensflare you want to add. For this photo I chose "white light" for the arriving train and "ruby glow" for the leaving train. Once you've added the first "white light" layer, you can duplicate it by right clicking on the layer you just added and selecting "duplicate"
- Adjust the settings of the added lensflare. I reduced the size of each lensflare with the "Scale" slider and additionally decreased brightness a little.
- Move the lensflare my clicking it and drag it around with your mouse button down.
Combining the various settings for each lensflare you can create stunning effects.
Care about some quick feedback about this article?


